Tuesday, January 8, 2013

I'm Retired!

Hello Readers and Pinterest Wanderers!

It has been awhile since I posted, but I wanted to let you know that I appreciate so much all the love and feedback I have received from my posts.  In March of 2012, I began a new job in a different field than Education and as a result I don't get the opportunity to create new bulletin boards and classroom ideas for you.  :'(  I am missing it terribly, as it was a great creative outlet for me.  I am loving hearing all of your comments though and I am so thankful that so many of you have found the ideas and tips useful!  Mostly now I just pin ideas from others on my Classroom Design Inspiration Bulletin Board on Pinterest.  If you are still interested in the things I find, I would love to see you over there!  Thank you again for all the support and I am so thrilled you love what I put my heart into!

Here is a link to my classroom design pinboard...

http://pinterest.com/sarahctree/classroom-design-inspirations/

And a quick link to my boards that I have created...

http://pinterest.com/sarahctree/my-bulletin-boards/

http://pinterest.com/sarahctree/my-tri-fold-games/

Bye friends!

Friday, February 24, 2012

Our Daily Schedule - Dots on Turquoise Collection


     Anyone who has worked with children for any significant amount of time will tell you that a well run classroom depends on structure.  Having something up so that children can visualize their day will greatly increase your chances of success with this endeavor.  Some of you may have seen a schedule like this in an earlier blog post using the Poppin' Patterns bulletin board set put out by Creative Teaching Press.  I love that set and looked high and low this year to see if they would put one out in their wildly successful Dots on Turquoise collection.  Sadly they did not release it for this year (fingers crossed for next year).  So, to take matters into my own hands, I created one myself using the products they currently have on the market.  Here is what you need to recreate this for yourself...

  • FLP30045R - 3X4 Red Tri-Fold Board
  • FLP30145R - Red Tri-Fold Header
  • CTP1868 - 4" Dots on Turquoise Punch Out Letters
  • CTP3883 - Dots on Turquoise Fancy Cards (Used these for the Digital Clocks)
  • CTP3884 - Dots on Turquoise Dot Cutouts 
  • SE84 - Clocks Notepad (Used these to create the Analog Clocks.  I cut out the edge of the clocks and pasted them to the dot cut outs.)
  • CTP4521 - Dots on Turquoise Name Plates
  • CTP7039 - Mini Dots on Turquoise Cutouts (Used these on the name plates)
     Enjoy!

Monday, December 19, 2011

S"mitten" with Winter


Because changing your bulletin boards can be very time consuming, often teachers are looking for fun seasonal boards they can put up and leave up for awhile.  If you're anything like me, you would love to decorate more for the holiday's. Unfortunately, it only gets to stay up a short amount of time; particularly with Christmas break coming so soon.  So, here is a possible alternative that will allow you to be a little festive and get away with leaving this cutie up until at least March!  :)  Here are the products I used...
  • PAC57218-12 - Light Blue 48X12 Fadeless Paper
  • T92164 - Snow and Ice Trimmer
  • T79741 - 4" Black Playful Letters (Used these on top of the mitten accents)
  • T10912 - Mittens Cut Out Accents
  • T8127 - Super Snowman BBS
Wishing You A Wonderful Winter!  :)


School is Cool


Penguins seem to be all the rage in winter and there are few cuter than the ones sold by Trend Enterprises!  This idea can be used on a board, door, or hallway.  Best of all, you can leave up until at least March!  Here are the products I used...
  • PAC56388 - Winter Time 48"X12' Fadeless Paper
  • CD1234 - Icicles Border (This item has recently been discontinued by Carson Dellosa, but any other icy looking border would look great.  My recommendation would be T92164 - Snow and Ice Trimmer from Trend.  It's super cute and gives the same effect!)
  • PAC5430E - White Poster Board (I cut this out to use behind the words, giving it a snowy effect.)
  • T79045 - 4" Snowflake Casual Ready Letters
  • T8202 - Playful Penguins BBS
The best thing about these patterned papers from Pacon Corporation is that you don't have to do a bunch of paper layering to get the snow scene effect.  Just unroll the paper and it looks great!   

Saturday, December 17, 2011

Farmer's Market Math


This math bulletin board is an interactive way to teach adding money.  In this activity, students pull a worksheet from the big pocket and complete it using the information given on the board.  Here are the products I used...
  • PAC57148 - Emerald 48"X12' Fadeless Paper
  • TF8290 - Fruits and Veggies Trimmer
  • TF8422 - Farmers Market Math BBS
  • TNT6450 - Bright Jumbo Pockets
The directions for the activity are found on the front of the yellow pocket.  In case you don't have a magnifying glass, here they are...
  1. Remove the worksheet from the pocket.
  2. Write your name on your paper.
  3. Complete the worksheet using the information found on the market bulletin board.
  4. Show your work on the back.
  5. Turn into the red basket for a grade.
An example of the kinds of word problems found on the worksheet are...

Jennifer has a pot roast simmering at home.  But she needs some vegetables to finish making dinner.  How much will she owe if she buys 4 carrots, 3 potatoes, and 5 ears of corn?  _____________________________________


Using the names of students in the class or teachers names from your school is one more way to make this fun for your students!  You may also find other ways to use this bulletin board set. It could be used for patterning, subtraction, or fractions!  It's very versatile with a little imagination.  Enjoy!  

Nativity


I love Christmas and I particularly love celebrating the birth of Christ.  For those who don't have room to set out a Nativity Scene in your classroom or church, here is a way to display it on the wall!  Here are the products I used...

  • PAC56228 - Night Sky 48"X12' Fadeless Paper
  • CD10074 - Sand Big Border
  • T92136 - Stained Glass Border
  • T79751 - 4" Stained Glass Playful Letters
  • T8125 - Nativity BBS
  • CD6324 - Names of Jesus Chartlet
I must tell you that this photo doesn't do the artwork on this bulletin board set justice.  It is really beautiful and although it is a cartoon drawing, it is sophisticated enough to look nice in a church foyer.  

The "For Unto Us A Child Is Born..." scripture reference is Isaiah 9:6.  

Merry Christmas!

Peacemakers & Peacebreakers


I was inspired to make this board after I found an anchor chart about Peacemakers and Peacebreakers on Pinterest.  It would look great on a classroom door or a large cabinet door as a gentle reminder to students about what kind of behavior you expect in your classroom.  Here are the products I used...
  • PAC57878 - Deep Purple 48"X12' Fadeless Paper
  • TCR4668 - Yellow Polka Dot Trimmer
  • FST5144 - 4" Green Polka Dot Fun Font Letters
  • TCR5147 - Peace Sign Cut Outs
  • TNT3512 - Assorted Flash Cards
Peace Out!  :)


Paisley Parts of Speech


This center is a great way to review Parts of Speech with your students in preparation for a test.  Here are the products I used...

  • FLP30045LB - Light Blue 3X4 Tri-Fold Board (I cut it in half, that way you get two games out of one!)
  • CTP6511 - Paisley on Brown Trimmer
  • T1789 - 2" White Stick EZ Letters (I cut apart the blue paisley pockets in the package to create the backing for the title.)
  • CTP6921 - Paisley Doodles Library Pockets
  • TNT3512 - Assorted Flash Cards (Cut down to fit in the pockets, they come a little long.)
  • TNT6450 - Brite Jumbo Library Pockets
  • CTP4916 - 2" Dots on Turquoise Letter Stickers (The paper behind the worksheet pocket and the directions is the library pockets cut apart and glued together.)
The directions on the right side are hard to see so I have included them below...
  1. Remove all the cards from the pockets.
  2. Read the sentences on each card.
  3. Determine if the word in bold is a noun, a verb, an adjective, or an adverb.
  4. Place the card in the appropriate pocket.
  5. Complete the response form and turn it in for a grade.
Here is an example of how the sentences are written on the cards...

Anna Brooke laid her head on the soft pillow and immediately fell asleep.

Hope your students have a blast learning about Parts of Speech!

Sophisticated Syllables


Looking for a center that will teach syllables?  This game is for you!  In this game students will choose cards from the "bank" pocket.  After reading the word on the card, they will clap out the syllables and decide how many they heard.  Then they will place it in the appropriate pocket.  Here are the products I used...
  • FLP30045PU - Purple 3X4 Tri-fold Board (I cut mine in half, giving me 2 games for the price of one!)
  • FST3138 - Black Decor Double-Sided Trimmer
  • CTP4193 - 2" Black Dot-to-Dot Uppercase Letter Stickers
  • TNT6097 - Big Flowers Black and White Library Pockets
  • TNT3512 - Assorted Flash Cards (Used on the front of the pockets and as the cards inside)
  • CTP4630 - 1" Black Dot-to-Dot Uppercase Letter Stickers
  • TNT6450 - Brite Jumbo Library Pockets (The paper behind the "Work Sheets" Title is the reverse side of the trimmer.)
In case you can't read the instructions on the right side here they are...
  1. Remove the cards from the bank.
  2. Read the words on each card aloud.
  3. Clap out the syllables you hear.
  4. Place the card in the appropriate pocket.
  5. Complete the response form and turn it in for a grade.
The paper behind the instructions is the library pockets cut apart.  The fonts on the cards and for the instructions were downloaded for free online.


Sassy Sentences


Here is a center idea for identifying parts of a sentence!  The items I used are as follows...

  • FLP30045OR - Orange Tri-Fold Board (I cut mine in half, 2 games for the price of one!)
  • CTP1108 - Jumbo Dots on Chocolate Trimmer
  • CTP4192 - 2" Dots on Chocolate Uppercase Letter Stickers
  • CTP6919 - Dots on Chocolate Library Pockets
  • TNT3512 - Assorted Flash Cards (I cut them down to size a little, they come a bit too long for the pockets.)
  • TNT6450 - Brite Jumbo Library Pockets 
  • CTP5930 - Jumbo Chocolate Dots Cutouts
As you can see the big pocket on the left is for the worksheets you will create for your students to complete.  

Here are the directions on the right side that you may not be able to see...

  1. Remove the cards from the bank.
  2. Read the sentences on each card.
  3. Decide if the bold words in the sentence tell who/what, action, or where.
  4. Place the card in the appropriate pocket.
  5. Complete the response form and turn it in for a grade.
Here is an example of each kind of sentence used on the cards...

The eagle perched on a branch. (Who/What)
The eagle perched on a branch. (Action)
The eagle perched on a branch. (Where)

You could even make up your own simple sentences using the names of students in your classroom.  This makes the game even more fun!

Perfect Punctuation


More and more often it seems that as text messaging becomes more prevalent, punctuation seems to be falling by the way side.  Here is a center to remind your students that good punctuation skills are always important and fun!
Here are the products I used...
  • FLP30045OR - Orange Project Board 3X4 (I cut mine in half, so you can get 2 centers out of one!)
  • CTP6510 - Dots on Turquoise Paisley Trimmer
  • CTP6920 - Dots on Turquoise Library Pockets
  • HYG43317 - Pocket Chart Cards - Assorted (Used on the front of the pockets)
  • CTP4916 - 2" Dots on Turquoise Letter Stickers
  • PAC5178 - Assorted Index Cards (Used these for the sentence cards)
You can also add a jumbo library pocket (TNT6450 - Brite Jumbo Pockets) to the back of your board to hold worksheets.  The worksheet can be completed by the student after playing the game to turn in for a grade.  Another good reminder is to laminate your pockets and cards.  This will ensure that you don't have rips or tears in them as they are used by little hands.  Happy Punctuating!  :)


Wednesday, September 28, 2011

Statistics Suits


Here is an interactive bulletin board for upper elementary.  I've spent a lot of time lately looking for ways to help teachers of older students.  I really love it because, although students don't actually move the pieces around on the board, it is an activity for them to complete.  This could easily be transferred to a tri-fold board and brought out as a center activity.  It sure beats those boring worksheets!  The inspiration for this board came from an activity I saw on Pinterest (my latest obsession).  There are lots and lots of activities there and plenty of things to get those creative juices inspired!  See my link on the lower right hand side to see my Pinterest boards.  The items I used on this board are...

  • PAC57038-12 - Flame Fadeless 48"X12' Paper
  • FST3147 - Black Sassy Solids Border (It's 2-Sided!)
  • FST5176 - 5" Bling Letters with Pearls (I didn't use the stick on pearls, but there are endless possibilities for using them elsewhere.)
  • TNT3492 - Notebook Paper Chartlet-White
  • TS4820 - Jumbo Playing Cards
  • CD5415 - Red Calendar Cover Ups
  • FX39-525VP - Plastic Gold Coins
The students are to fill out their papers the same way the chart on the board is done for each hand of cards.  The key at the bottom gives the values for the Ace, Jack, Queen, and King.  The hand numbers are some solid calendar cover-ups, but you could print some off to use if you don't have any old ones left over.  I mounted them on some of the left over trimmer and cut them apart (I wanted to make sure they stood out against the red paper.)  The plastic coins are lightweight and I just put them up with Mavalus Tape.  Once again, I'm sorry for the grainy cell phone photo.  I would love to hear any feedback about how your students like this activity!   

Tuesday, September 27, 2011

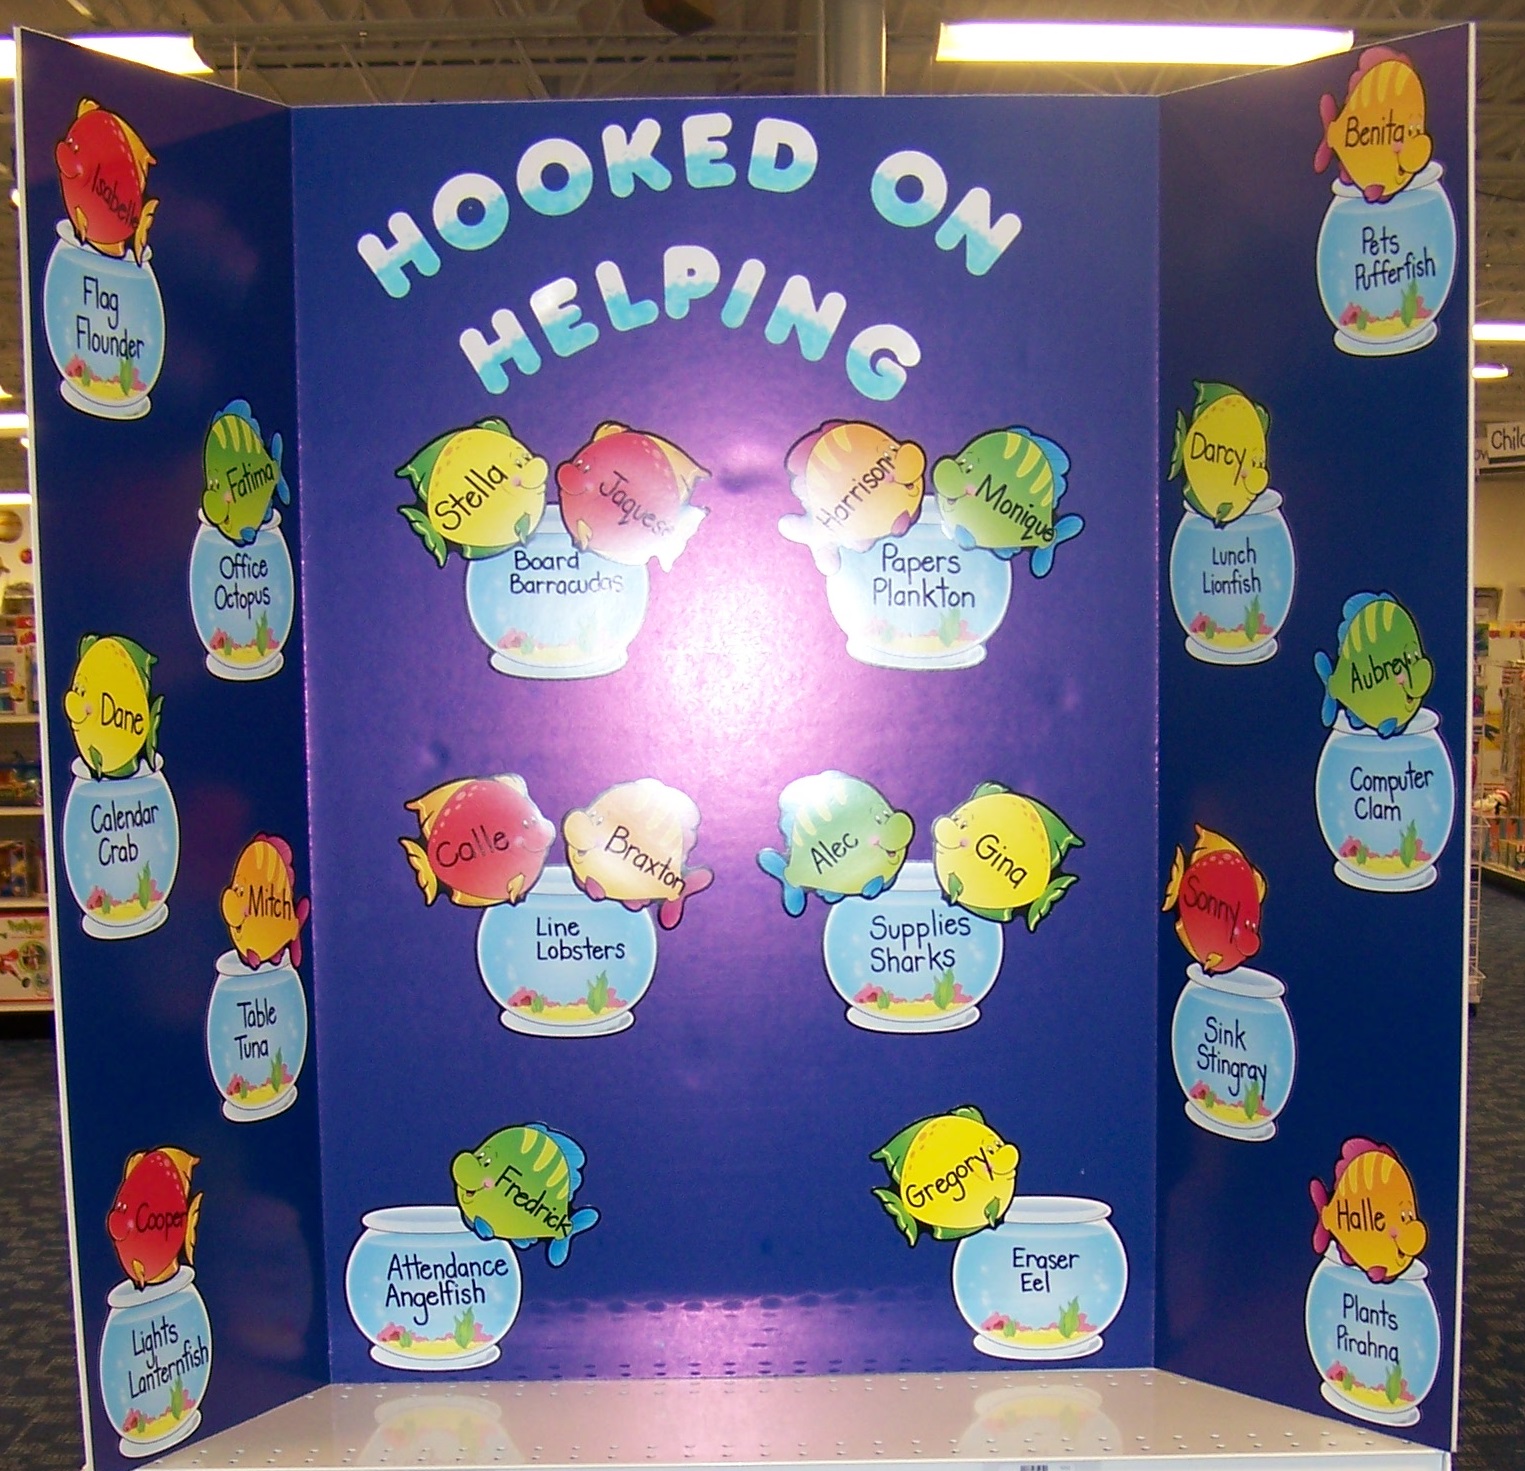
Hooked On Helping


I'm always looking for fun ways to make class jobs more exciting!  With this fish themed board, you can make a chore seem like a thrilling activity!  I always like to make fun names for my jobs (see the polka dot job chart), so with this one I incorporated the aquatic theme and here is what I came up with.  Here are the items I used...

  • FLP30049BL - Dark Blue Foam Project Board
  • CD120041 - Fish/Bowl Cutout Buddies 
  • T436 - 2" White Casual Letters (I used a blue highlighter to draw waves on the bottom half of the letters, making them look like they go with the theme.)
And for those who are interested, here are the job titles I used...

  • Flag Flounder
  • Office Octopus
  • Calendar Crab
  • Table Tuna
  • Lights Lanternfish
  • Board Barracudas
  • Papers Plankton
  • Line Lobsters
  • Supplies Sharks
  • Attendance Angelfish
  • Eraser Eel
  • Pets Pufferfish
  • Lunch Lionfish
  • Computer Clam
  • Sink Stingray
  • Plants Piranha
I hope you enjoy this job chart and your students complete their tasks swimmingly!  :)

Back to School "Fur"-enzy


This year it seems as if Monsters and Furry Friends were all the rage!  There were so many cute items out there and creating a theme around it was a cinch! If you were one of those teachers on top of trends this year and you need an idea for Back to School, check this one out!  Here are the products I used...

  • PAC57178 - Brite Blue 48"X12' Fadeless Paper
  • T92341 - Pink and Green Wave Striped Trimmer
  • T79801 - 4" Furry Friends Combo Letters
  • T8312 - Big Furry Friends Characters BBS (I layered them on the right hand side of the board)
  • T8313 - Furry Friends Clubhouse BBS
  • T8314 - Furry Friends Seasonal Fence BBS
The coolest thing about the Clubhouse and the Fence Bulletin Board Sets is that you can adjust them to fit the size of your board.  I have an unusually large board to fill, so perhaps you only need one set to fill your board. If your board isn't as tall or as long as mine, don't fret, there are several photo layouts shown on the inserts included with these 2 sets showing you the different ways you can assemble them to fit the size board you have!  That is one reason I especially like them!  I hope your year is FURtastic!  :)

Barrel of Monkeys


Who wouldn't love a barrel of monkeys?  Well, maybe stuffed monkeys would be a little less crazy. If you are doing a monkey/jungle theme or if you're looking for a way to decorate a hallway wall or maybe even the outside of your door...then this board is for you!  
I actually made a "barrel" out of a tri-fold board and attached it to the wall.  All it took was a little trimming...I cut about 5" off each side (mostly because I didn't want it to stick out from the wall too far), but if you have room then that isn't even necessary.  Then I covered it with the weathered wood paper, I taped a long flat box (like you would use to store things under a bed) in between the board and the wall.  This adhered it and also made it really sturdy (I covered it in the wood paper too, just in case anyone looked down inside).  You may have a better idea for how to attach this, but I improvised with what was available to me at the time.  :)  In order to make the monkeys sitting on the edge of the barrel sturdy, I attached the top half of a  popsicle stick to the back of the monkey and the other half to the back of the tri-fold.  This made them stand up straighter and kept them from falling.  I also used the banana cutouts as my "trimmer."  This allowed me to cover up those yucky crooked cutting edges on the side of the board.  Here is the full list of what I used...

  • PAC56888 - Bamboo 48"X12' Fadeless Paper 
  • T16009 - Banana Cutouts
  • PAC56518 - Weathered Wood 48"X12' Fadeless Paper
  • A Tri-Fold Display Board in any color (White is usually cheapest, you'll be covering it so color is not important.)
  • T8201 - Monkey Mischief BBS
  • T79743 - 4" Yellow Playful Letters
This board was inspired by a bookmark from Trend Enterprises.  They are also the makers of the cute monkey bulletin board set!

Friday, September 16, 2011

Juicy Geometry


Of all the areas of math that there are to be explored, I must say Geometry is my absolute favorite!  It's the only math I ever got an A in, so when a friend approached me about doing a geometry game to help teach the basics I jumped at the chance!  In this game students are to match 2 cards to each pocket.  One card shows a picture of the word on the pocket, like an angle for example.  The other card has a definition of the word on it.  Students must master the vocabulary and know what the definition looks like drawn out in order to complete this game.  A large pocket could be attached to the back of the board with a worksheet inside, testing the student's mastery of these concepts.  It would be turned in upon completion of the game!  Here are the items I used...

  • FLP30045LB - 3X4 Light Blue Project Board (I cut mine in half. Then you get  2 games for the price of one board!)
  • CTP2663 - Playful Patterns Trimmer
  • CTP4190 - 2" Dots on Black Uppercase Letter Stickers 
  • CTP6918 - Poppin' Patterns Library Pockets
  • HYG43317 - Pocket Chart Cards-Assorted Colors (Used these on the front of the pockets.)
  • TNT3512 - Blank Assorted Flash Cards (I cut these down and used them as the cards that go in the pockets.)
  • CTP5933 - Poppin Patterns Mini Dots Cutouts 
I hope this board creates a fun new way to look at Math!  

Friday, September 2, 2011

Birthday's Are "Cool"


Have you been looking for a "cool" way liven up your birthday display?  Why not try Ice Cream Cones?  On this board I used the Cut Out Buddies from Carson Dellosa.  The cones and scoops come separate, which is nice because it doesn't require you to take the extra step of cutting them apart.  I wrote the month names on the cones and the student's names and the day of their birth on the scoops.  It turned out really cute.  Just be careful to plan your placement of the cones ahead before you attach them, because if you have a cone with several scoops, then you will have to adjust everything so it will all fit!  Have fun!  Here are the products I used...
  • FLP30045PK - 3x4 Project Board (I used Pink, but any other color would work too.)
  • CTP6472 - Blue Sprinkles Border
  • CTP6577 - 4" Sprinkles Letters
  • CD120045 - Ice Cream/Cones Cut Out Buddies
That's all you need!


My Camera Went to Heaven

It is very, very sad for me to report that my camera went to live with Jesus.  :(  I have lots and lots of new boards and ideas to share with you, but have had no way to do so!  My camera died in the gift shop bathroom at the Jordan River Baptismal Site in Israel.  I was changing clothes and dropped him.  I guess that would be the best place for a camera to die right?  But not so great for me and not so great for you, who have been so kind to follow my little blog!  I missed out on plenty of photo ops in Israel, but thankfully many of the group with me shared theirs!  
I have waited and waited hoping to save enough money to buy a new camera, but I have waited long enough and really need to update before I forget about these ideas.  That said, I am going to post new entries...but the photos are from my smart phone camera.  Some of them are grainy and a little shotty.  I'm sorry for that.  Hopefully, I can get better shots soon...anyone have a camera they wanna loan me?  Haha.  At any rate, I post all this to say that more ideas are coming and I'm sorry for the quality of the photos!  I hope you like all that I have been doing!  Blessings to you friends!

Monday, April 11, 2011

Jesus Loves "Ewe"

Of all the boards I have designed, this has to be my favorite Inspirational Bulletin Board. It's just so sweet and has such a simple message, but it is the source of everything the Christian Faith teaches. In the end it all comes back to the love of Jesus. Here are the items I used to create this board...
  • PAC56398 - Landscape 48"X12' Paper
  • T79744 - 4" Blue Playful Letters (The green are no longer available)
  • CD3302 - Jesus Loves Me Border
  • CD3416 - The Good Shepherd BBS
The fence, hills, and flowers seen here are all on the landscape paper when you unroll it. It's one of the best things about all the mural papers that are coming out now. Awhile back if you wanted a scene like this, you would have to buy individual pieces and create it. Not so anymore! This makes the entire process cheaper and easier! I don't know about you, but I LOVE cheap and easy! The green gingham letters I used on this board are no longer available. However, the number I have listed above is for a pretty solid blue playful letter that will look stunning and really pop on that light blue background. I am in love with this board and I hope it is a hit for you this Spring!

Wanted By God

I created this board for Vacation Bible School in 2010. Although it was originally meant for VBS, it could still be used effectively in a church foyer or children's hall. Here are the products I used...
  • PAC56468 - Clouds 48"X12' Fadeless Paper
  • CD110072 - Grass Big Border (2 Pkgs)
  • CD1256 - Red Bandanna Border
  • CDDJ608001 - Wooden Frame Trimmer (2 Pkgs)
  • TF3075 - Western Round Up BBS
  • FST5122 - 4" Red Bandanna Letters
The fence here does not come in a bulletin board set. I made it using a wood frame border that is manufactured by DJ Inkers from Carson Dellosa. It seemed to work well and the beauty of it as opposed to a split rail fence BBS is that you can make this as long as you like! I ended up using 2 packages of the big grass border, but if you don't need 2 rows of grass, one will work fine, just tuck the fence post behind the border.